

Years ago I had fallen in love with my husband and my cat so I know how it feels to fall in love but wow, when I had the first bite of this Ftira bread I fell in love all over again but this time with Ftira!! My friend Georgina who came from Malta (for those who read my Maltese Cheese post should be very familiar with her) made me a loaf of this heavenly bread when I visited the Bay Area and it was really the best bread I have ever had. It was fluffy and chewy all at the same time, it is great with just a little bit of butter and a little jam or a drizzle of honey. It is also a great sandwich bread or breakfast toast. I went a little bit further and tried to grow my own yeast to make my sour dough starter and with that I combined the Japanese and the western method for making my sourdough starter. It takes a longer time to get the starter started but it is well worth the time spent. Ever since I had my first bite with this bread, I was hooked and now I make this bread every day. Once you have tasted this bread, there is no going back! When my friend Karen told me that Georgina's bread is the best bread in the world, she was not lying!!! And I give all the credits of this posting to Georgina for this wonderful recipe and for getting me totally addicted to this artisan bread!
Growing the yeast:
- A glass jar with turn lids
- Cut half a peeled apple and dice them or you can use raisins as well
- Put the diced apple or raisins into the jar
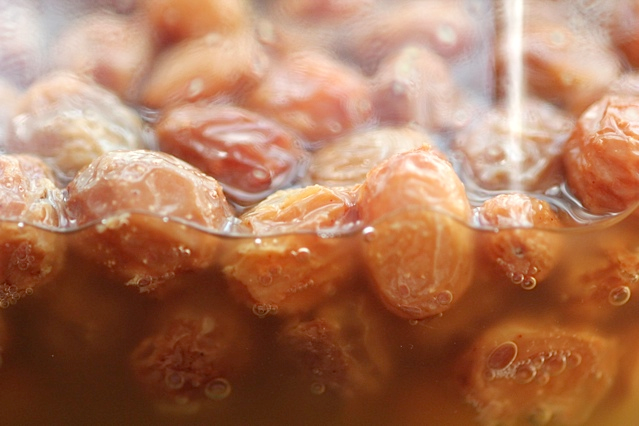
- Add filtered cold water into the jar just enough to cover the apples/raisins
 |
| Picture taken by Georgina Lawrence |
- Close the jar and leave it over night, the next day you open the lid and let the air out and close the lid again, and you do the same thing for the next 5 to 7 days, at first the apples/raisins will floats then the apples/raisins will sink to the bottom and later on the days they will float again and will have bubbles forming around the edges of the water rim. That is a sign of natural yeast growing inside. When there are enough bubbles around the edges the fermented apple/raisins water is ready to be used.
 |
| Picture taken by Georgina Lawrence |
- Like Georgina puts it that when you hear a "Piffs" when you open the jar, that is a great sign that gas is being formed and that the water is being fermented.
- But be very careful because sometimes that molds can formed and when that happens throw the whole thing away and start over because you do not want to use molded water for your bread
- When the yeast water is nice and healthy, it should have a mild to strong alcohol smell and it should smell like a sweet white wine or nice quality vinegar and if in doubt throw away and start all over
- When water is fermented, strain out the apple pieces/raisins and just use the water
- And if you feel like experimenting, you can try with other fruits too such as grape or berries, etc. Or if you do not feel like doing this part at all, you can skip this part altogether and proceed directly to making starter with only flour and water, it will be just as nice.
1/4 cup of all purpose flour (I like to use Gusto brand or King Authur unbleached AP Flour)
1/2 cup of the strained apple/raisins fermented water or just filtered water
- In a glass jar with lid, mix together the flour and water
- Stir well
- Close the lid and let it ferment for a few hours or over night
- When the starter looks bubbly
- Starter is ready to be used for bread making

- Starter can be used over and over again, much like taking care of a baby, starter needs to be fed in order to keep the healthy yeast bacteria alive and in order to do that, you will need to add about 1/4 cup of flour and 1/4 cup of water to the starter and maybe a little bit of honey to keep the starter going. If you do not plan to use the starter often you can park the starter in the fridge as that will delay the growth of the yeast. When you plan to bake, take out the starter and leave it at room temperature the day before baking and feed the starter as mentioned above after using the starter. A good sourdough starter can be used for as long as you keep it alive.
 |
| When starter is active there should be lots of bubbles on top of the starter |
Making the dough and baking the bread:
1 1/2 cup of bread flour
1 tsp of honey (or sugar)
1 tsp of Kosher salt or sea salt (please do not use table salt)
1 Tbsp of oil
1/4 cup of starter
3/4 cup of water
1 tsp yeast
- I personally love making bread dough in my bread machine (especially I have a really nice Japanese one from Japan by Panasonic which has an automatic yeast dispenser), the reason is because bread machines create a perfect environment for the dough to rise and sometimes we do not live in an area that is warm enough for bread dough to rise optimally so the dough cycle in a bread machine would be the best option
- If you do not have a bread machine, then you can make the dough the traditional way but make sure you dilute the active dry yeast into a little water before adding to the dough if you are hand mixing the dough
- And if you are using a bread machine, please consult your owner's manual and follow the instructions for the order of putting the ingredient into the machine. As some machines flour gets put in first and some machines water get put in first so it is important to get your ordering correct to create the best dough possible
- Also please note that it is best not to have the yeast gets in contact directly with the salt as they do not get along well with each other and if they get in contact before mixing sometimes the salt will weaken the strength of the yeast
- Once the dough cycle is done, sprinkle some flour on the work surface
- This dough should be a wet dough as that gives the bread crumb the large beautiful holes and also the lovely chewy texture
- Just put the dough onto the flour surface

- Divide the dough in halves
- Flour the top of the dough and flatten each of the dough

- Transfer each of them to a piece of dough to a piece of parchment paper then create a hole in the middle of the dough to form the donut shape of the bread

- Place a pizza stone (or unglazed terra cotta tiles) on the bottom of your oven and preheat oven at 425F degree
- Meanwhile cover the doughs and let them rise for about 20 minutes
- I like to use a glass mixing bowl to cover the dough but you can use a towel or plastic wrap but I like using an upside down bowl because this way nothing will stick to the dough and create a sealed and moist environment for the dough to rise

- Once the dough rise for about 20 minutes, you can transfer the dough to the preheated oven for baking or if you like you can add toppings to the dough and in my case I love cheese so I brush water lightly on the dough then I sprinkle a generous amount of cheese on the top then bake

- Baking will varies between 12 - 20 mins depending on your oven and the way to tell when the bread is done, the bread should be even browned and when you knock on the bottom of the bread it should sound hollow
|
| Original Ftira |
 |
| With Cheese |
- After you take the bread out of the oven, put it on the rack and let it cool before cutting. I know that with the smell of the bread, it is hard to resist wanting to break the bread right away but gluten needs time to form and mature better when it is eaten cool or just slightly warm
- This bread freezes really well, when you want to eat the bread just bring the Ftira back to room temperature and reheat in the oven for a few mins to refresh it a little if you like
 |
The wet dough creates the big holes texture of the bread |
well done! That is some fantastic looking bread, there, Friend! I'm sure you've made many friends happy with that :-)
ReplyDeleteThank you Karen!!!! Thanks to you that I got to know G and therefore got to know Ftira my best friend!! ha ha If it wasnt for you, I would not be baking this fantastic bread everyday now!!!!
DeleteSo funny cause I have ftira and cheese going at this moment. Made me smile (the pfffft bit especially) PLUS I actually learned something too...didn't know that salt and yeast did not get along!! So there you go!! Well done to showing step by step instructions...anyone following them will be sure to make super looking and tasty bread just like yours!! Totally enjoyable read...thank you once again!!
ReplyDeleteOMG you are thanking me??? I should be thanking you!!!! You are why I got to taste the best bread in the world!!!! If it weren't for your wonderful recipe I would not have endless hour of bread eating enjoyment ha ha ha So thank YOU! Glad you learned something too I sure learned a lot in this process.
DeleteOh me too! About the salt and yeast.. I was always careful to make sure the yeast did not touch liquid, but I don't think I was careful about the salt!
DeleteThis bread sounds wonderful. I must try it!
ReplyDeleteHi, I just saw your lovely posts about Maltese food. I'm Maltese and live in The Netherlands. I miss the cheeselets and was trying to buy the moulds and dripping tray as shown in your photo. Would you please let me know where you bought them?
ReplyDeleteSorry took me a while to see this but my friends got them for me from Malta do maybe I can find out for you!
ReplyDeleteNo worries. I managed to get the moulds but not the dripping tray. I would appreciate it if you could find out for me. However, I could also probably do without the tray.
ReplyDeleteFtira with cheese!!! Ftira should be eaten how we Maltese eat it. Halve it horizontally. Get a ripe organic tomato you can find cut it in half and deseed. Rub half on one half of the ftira and the other same. Sprinkle sea salt and pepper capers olives and tuna (vegetarians leave this out). Drizzle plenty of olive oil and indulge.
ReplyDeleteMade this today and it turned out like the ones we buy locally. Thanks.
ReplyDeleteMust feed "baby" for next bake.
Thank you for honouring our traditional Maltese bread. I will definitely be trying this out
ReplyDelete